
And finally the first of the two tutorials I promised... How to install a working lamp in your setting! It works just the same if you need more than one lamp too. Just try to get all the information about voltage and amperage needed to keep the amount of lamps you have in mind. The salesperson of the store you buy the material should be able to provide you with that info.

Bem, vamos lá! Este foi o material que usei, e mais na frente digo onde você pode comprar. Você pode procurar na sua cidade em casas que vendem materiais elétricos, especialmente eletrônicos, para quem monta rádio, faz manutenção, coisas assim. Vou deixar aqui links para sites onde você encontra este material online:
Ok, so let's go! These are the materials I used. I chose them because they can be found in Brazil. If you live abroad, you'll have better options.

- 30 cm de cabo de rede. Esse cabo que usamos no computador para ligar na internet. Dentro dele tem uns cabos bem fininhos que são ótimos para minaturas. Geralmente o mínimo que vendem é meio metro, mas é super baratinho! Outra opção é o "Flat cable", que é usado para conectar partes internas do computador.
- Ferro de solda. Pois é, precisa soldar... O ideal é comprar um de "baixa" temperatura, senão pode queimar os LEDs (pergunte-me como eu sei disso...) Uso um de 25W, que chega a 400º C.
- Solda, do tipo para eletrônicos
- Isolante (ou espaguete) termo retrátil. É um tubinho de "plástico" que encolhe quando aquecido, ajustando-se ao tamanho certo e serve como isolante para evitar curtos-circuitos.
- Suporte para duas pilhas palito. Como vou usar um LED só, de 3V, e cada pilha palito fornece 1,5V, preciso de duas... Se você usar outro tipo de lâmpada, informe-se sobre a voltagem antes! Algumas podem precisar de mais energia - como as comeciais já prontas para miniaturas, que são de 12V, ou, pelo contrário, de um resistor para baixar a energia que vão receber e não queimar. Informe-se direitinho com o vendedor!
- Usei um globo para luminárias em miniatura. Mas você pode usar uma conta ou outro item adaptado. O importante é que jamais encoste no LED - veja se há espaço suficiente por dentro!
- E também usei uma argola de metal que pintei com esmalte preto para formar o conjunto.
- Duas pilhas palito, naturalmente... :)
- Um LED de 3V. Veja se encontra de cor "quente", senão fica um azulado muito artificial. A melhor fonte de LEDS são as luzes de natal "made in china". Logo algum fio quebra ou algo acontece, e vc fica com 100 LEDs que não têm mais uso como enfeite de natal, mas que dá para aproveitar em miniatura! Aproveite que o natal está chegando...
- Um minúsculo interruptor. São chamados "Chave SS". Esse é um onde os terminais de solda ficam a 180 em relação ao interruptor. Tem modelo de 90 graus também.
- Uma pinça invertida para segurar o fio no lugar enquanto solda. Uma outra boa ferramenta é o "terceira mão", que vem com dois "jacarés", com lupa e apoio para o ferro de solda. Eu tenho, uso e recomendo!
- Outro opcional é a pasta para soldar Soldatec. Não é imprescindível, mas pode ajudar.

- 1 foot of network wire, the kind we use to get internet access on our computers. Inside there are 4 pairs of thinner wires, great for miniature. Another option are "flat cables", used inside computers to connect its parts.
- Soldering Iron. Oh, yeah. There is soldering involved... The ideal is to used one with a "lower" temperature, or you might burn the LEDs (ask me how I know...). I used a 25W one, and this one will reach 1003ºF, which is only relatively "low"... So, be careful!.
- Solder. A 60/40 rosin core, for electronics, is best.
- Heat shrink tube. Used to protect and isolate the joints. It shrinks to fit the space when heated with a heat gun, the soldering iron (just keep it close, don't touch) or - not recommended - a lighter.
- A battery holder for 2 AAA batteries. As I'm using a 3V LED, and as each AAA battery supplies 1,5V, 2 are needed... If you use any other kind of lamp or LED, make sure you match the batteries to supply what the lamp/LED needs.
- I used a miniature globe. But you could also use a bead with a large hole or any other Trash to Treasure item. What is important is that it should never touch the LED. Make sure there's enough room inside!
- And I also used a metal ring, which I painted black.
- Two AAA batteries, naturally... :)
- A 3V LED. Make sure you get the "warm white", or else you'll end up with a very bluish and artificial shade of white. The best cheap source of LEDs are Christmas lights. Those are inexpensive and usually won't last long as a set, but you can use the individual LEDs for your miniature projects. As Christmas is getting closer, it's time to stock up!...
- A teeny-tiny switch. Those are called "SPDT Sub-Mini Slide Switch", I think. The ones from Evan's Design are better, believe me! :)
- Reverse tweezers to hold wires in place while soldering. Or you could use a 'third hand' pictured above, which comes with two clips to hold the wires, a magnifier, and usually also a place to rest the soldering iron. I have one, I use it and I recommend!
- Another optional 'tool' is an acid-free flux, liquid or paste. Not essential, though.

Here I give some suggestions on where people in Brazil might find those items. If you live abroad, I suggest you look for similar or better items using Cri-Kit or one of the led kits by Evan's Designs kits... In case you really, really, really want to make it exactly as I did, I believe you can find all items at Radio Shack.
Ok, vamos ao tutorial então! :)
Ok, let's do it, then! :)
Preparação: O papel de parede ou outro acabamento na parte interna da parede já deve ter sido aplicado. Faça um furo para passar o fio. Do lado externo, faça um "canal" por onde passará o fio até o lugar onde será instalada a bateria. No meu caso, trabalhei em papel-pluma. É fácil escavar o "canal", com estilete e régua, basta inclinar o estilete um pouco formando um ângulo, e cortar em cada lado do "canal", formando um "V". Depois o canal pode ser aprofundado com um boleador, se preciso. Se for trabalhar em MDF, é preciso usar uma dremel ou uma lima redonda.
Preparation: apply the wallpaper or painting to the wall that goes inside the setting. Drill a hole for the wires. On the outside, make a groove to place the wires, leading to the floor/base, were the battery will be installed. In my case, I used foamboard, so it was very easy to carve the groove. Just use a craft knife tilted in an angle. Then do the other side to carve a "V" shaped groove. You can make it deeper and round it up later using a ball-tip embossing tool. If you are working on wood or MDF, you'll have to use a dremel or a round needle file.


Obtendo o fio: Se você abrir a ponta da capa do fio do cabo de rede, verá que dentro dele há 4 pares de fios finos. Abra um pouco mais a capa do cabo, escolha um par de fios: um vem numa cor sólida e o outro é branco com uma linha da mesma cor, verde no meu caso. Puxe o par com um alicate, com jeitinho.
How to extract the wire: if you open the tip of the network cable insulation, you'll see that there are 8 intertwined smaller round wires. Open that insulation cover a littel more, pick the pair you want: one comes in a solid color and its pair is white with a line of matching color. I chose the green pair. Pick the pair with pliers and gently but firmly pull/slide it out.

O par de fios já vem trançado. Esse foi o par que escolhi...
And here is the pair of intertwined pair I chose...

Separe as pontas e remova um pedaço da capa isolante de cada fio. O jeito mais fácil de fazer isso é com o próprio ferro de soldar, como na foto, porque o fio é muito fino para cortar de outro jeito. Corte um pedaço do isolante termo retrátil para cada ponta (tubo preto na foto).
Unwind/Pull the tips apart and remove 1/4" of the insulation from each tip. The easiest way to do this is using the soldering iron, like in the picture. That's because the wire is too thin to use a regular stripping tool, and a craft knife will probably cut the wire inside as well. Cut two pieces of the shrinking tube (about 1 inch) and place on each wire (it's the black thing in the picture)

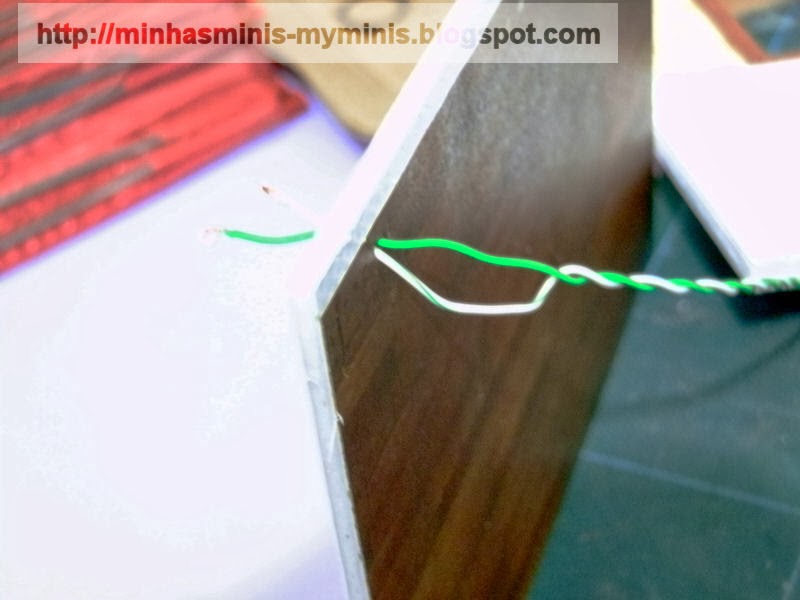
Enrole cada fio com cada ponta do LED como na foto: uma em cada "perna". Ainda não é preciso soldar. Por enquanto só estamos testando se o LED funciona, se os fios estão íntegros, se o suporte de pilhas não tem defeito e se as pilhas estão boas. Encoste as outras pontas do fio torcido, uma na ponta de cada fio que sai do suporte de pilhas. Não deixe os fios de cada lado encostar no outro, senão dá curto. Na foto prendi com fita para poder tirar foto. Na verdade faço o teste só segurando uma ponta em cada mão e encostando cada uma em cada fio que vem do suporte de pilhas, bem separados um do outro. Às vezes importa qual fio encosta em qual. No meu caso não importou. Se o LED acender, está tudo bem! :) Se não acender, inverta os fios, verifique se os fios estão realmente em contato e mude cada um dos elementos por vez (pilha, fios, LED, suporte) até achar o que está errado. A cada etapa de soldagem, teste novamente! (e remova as pilhas em seguida ao teste e antes de soldar!).
Twist each tip around each terminal wire of the LED, like in the picture. Nothing has been soldered yet. For now, that's just for testing everything: if the LED works, if the wires are intact inside, if the battery holder is working properly. If the LED has a positive and a negative distinction (mine didn't), make sure you have the right end connected to the battery wires and remember the color wire used. Do not allow red & black or each leg of the LED touch, or you'll short-circuit and damage the whole thing. I taped things down just to be able to take the picture. Usually I just hold the wires one in each hand and touch each tip on each wire that comes from the battery holder for testing. If the lamp doesn't light up, test each item at a time: change the wires sides, change the whole wire, change the battery support, change the batteries, change the LED. From now on, after each soldering step, test again to make sure it's still working! (and remove the batteries right after testing, before soldering!)

Se tudo estiver bem, é hora de começar a soldar. Eu NÃO sou especialista em solda! Ainda erro bastante, mas já acerto o suficiente para que funcione... Não consigo soldar e tirar fotos, então vou passar aqui uma lista de vídeos que mostram como soldar e dão várias dicas. As principais são:
- Use uma superfície para proteger a mesa. Eu uso um pedaço de papelão, que posso jogar fora depois.
- Mantenha a ponta do ferro limpa, removendo solda antiga. Geralmente usa-se uma palha de latão (eu uso o papelão mesmo) e depois encoste numa esponja molhada, que o choque térmico remove o resto dos resíduos.
- Mantenha o local ventilado: a fumaça da solda contém chumbo e pasta de solda (que vem dentro do fio de solda) e é tóxica. Evite respirar isso!
- Jamais derreta a solda no ferro para passar para o fio depois. Você deve aquecer o fio/superfície onde será soldado e aplicar a solda a eles!
- Seja rápido (por isso não consigo tirar fotos deste momento). O ideal é 2 a 3 segundos no máximo...
- Evite mover o fio até que a solda esfrie/endureça, senão estraga tudo.
If everything is working properly, it's time to start the soldering job. I am NOT a specialist in soldering! I still make mistakes, but I get things working... :) I cannot solder and take pictures at the same time, so I'll list below some very informative videos on soldering, with relevant tips. The main tips are:
- Use something to protect the table surface. I use a scrap piece of corrugated cardboard, that I can just throw away after I'm done.
- Keep the tip of the soldering iron clean, removing old solder. For that usually a brass mesh is used and then we touch the hot tip on a wet sponge. The thermal shock will remove the residue.
- Work in a ventilated room. Literally: turn a fan on. The smoke that comes from the solder contains lead and flux, and both are very toxic. Do not breathe that!
- Never melt the solder on the top of the iron to then transfer it to the wire. The right way to do things is to touch the wires with the hot tip until they're hot too (1 or 2 seconds) and then apply the solder to the wires (another 2 to 3 seconds)!
- Work fast (that's why I cannot take pictures!) The ideal is no longer than 2 to 3 seconds...
- Do not move the wires (or shake your hands, the table, etc) until the solder cools off/hardens, or it'll be ruined. It might work for a while but you might have problems a month later...
Vídeos em inglês:
Videos in English
How To Solder - Intro/Joining Stranded Wires - Part 1
Basic Soldering Lesson 1 - "Solder & Flux"
Este é o melhor deles! É um curso da década de 80(?), que explica todo o embasamento técnico e é voltado para componentes eletrônicos, mais perto do tamanho que usamos aqui...
This is the best one of them all! It's a video class from the 80's(?) where all the principles are explained in detail, and is focused on soldering for electronic components, which is closer to our work in terms of scale...
Evan's Designs.
Vários vídeos excelentes que ensinam como eletrificar com fios finos, LEDs, etc.
They have excellent videos where they teach how to electrify using thin wires, LEDs, etc.
Vídeo em português:
Video in Portuguese:
Tutorial: Como soldar componentes eletrônicos
 |
| Se você assistir aos vídeos, verá que minha soldagem é ruim. Mas funcionou... If you watch the videos, you'll see my soldering was bad. But it still worked... |
Mark the spot where the iron will go from the end of the wall through the "floor", which also needs to be already finished.

Passe os fios pelo furo que fez na parede.
Take the wires though the wall hole you drilled earlier.

Dobre e encaixe no canal. Eu uso até um pouco de cola (usei uma chamada "silicone líquido", que não é silicone, hehe) para manter o fio no lugar.
Bend and fit the wires into the groove. I even use a bit of glue (I used one called "liquid silicone", but it's not silicone, lol) to keep the wire in place.

If the back of the wall won't be visible in your project - like a wall that's permanently facing backwards, for example - don't even bother about finishing. It'll suffice to use a masking tape or scotch (magic) tape to cover the groove and paint, if you want. As it would be visible in my project, I glued the "brick" wallpaper on top of it. The groove "disappears"!

"Instale" a luminária. No meu caso, colei o aro pintado e depois o globo.
"Install" the light fixture. In my case, I just glued the painted metal ring on the wall and on top of that, the plastic globe.

Passe o fio pelo piso e instale a parede no lugar (no meu caso, bastou colar).
Take the wire through the floor and glue the wall in place (in my case, glue was enough).
Agora é a hora de soldar no interruptor e nos fios que vêm do porta baterias. É assim:
- um fio que vem do LED deve se juntar a um dos fios que vem do suporte. Na hora dos testes você determina se importa qual fio deve ser. No meu caso não fez diferença (não havia lado positivo ou negativo no LED), então escolhi o vermelho do suporte de baterias com o branco do LED. Junte os dois e solde os dois juntos. Lembre de colocar o tubo isolante no fio antes de soldar!
- o outro fio que vem do LED deve ir em um terminal (ou em um deles se só tiver dois)
- o outro fio que vem do porta-baterias deve ir no último terminal (ou no outro, se só tiver dois)
IMPORTANTE: REMOVA as pilhas sempre que for soldar! Senão pode causar um curto e gastar suas pilhas todas, super-aquecendo. Pergunte como eu sei... :)
 |
| Este é o princípio do circuito que iremos formar. This is the principle for the circuit we're creating. |
Now it's time to solder the switch and the wires that come from the battery holder:
- one wire that comes from the LED should be connected to one of the wires that come from the battery holder. You must have already decided which one when you tested in the beginning. In my case it didn't matter (no positive or negative "legs" in my LED), so I picked the white one from the LED and the red one from the battery support. Solder them together.
- The other wire from the LED (in my case, the solid green) must go to one terminal
- The other wire from the battery holder (in my case, the black one) must go to the last tip of the switch (or the other one, if yours only has two)
IMPORTANT: REMOVE the batteries before soldering! Or else you might cause a short circuit and you'll over heat the batteries and wear them out. Ask me how I know... :)

Prenda o porta-baterias no fundo com fita-banana (dupla face de espuma) e os fios com fita crepe, só para não ficarem soltos.
Hold the battery holder down with a double sided heavy-duty tape, and tape the loose wires down with masking tape.

Eu também gosto de passar uma fita (isolante ou crepe) nas juntas para evitar curto, só por excesso de cuidado mesmo...
I also like to carefully place a tape (electrical or masking) around each joint, or one of them, just as a precautionary measure...
Faça uma abertura para encaixar o interruptor, encaixe e cole e pronto!
Make an opening wherever you choose, to fit the switch, fit and glue it there and voilá!


Se você curte meu blog, você bem provavelmente também vai gostar da minha fanpage no Facebook também. Visite agora e "curta" minha página lá:
If you like my blog, you'll very likely like my fanpage on Facebook as well. Visit and "like" it:

.