Mostrando postagens com marcador Toscana. Mostrar todas as postagens

quarta-feira, 12 de dezembro de 2012

Casa Toscana II - Tuscany House II

ATUALIZAÇÃO (post original):

Consegui finalmente fazer as luzes funcionarem, e acrescentei uma grade na lateral.


UPDATE (original post):

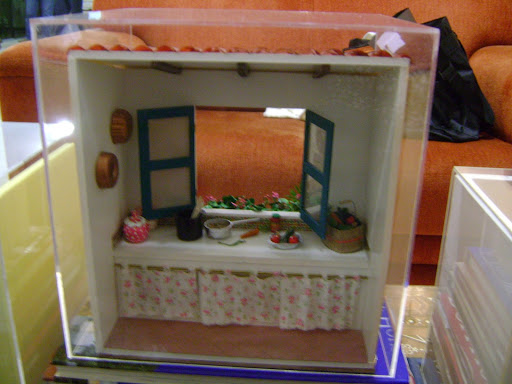
I finally managed to make the LED lights work, and I also added a railing on the side of the porch.

A grade eu achei no ebay. Era um pouco maior que o espaço disponível, então tive que adaptar. E também não é tão delicada quanto o portão de chipboard, mas acho que combinou bem... :)
I saw this "Victorian railing" on eBay and just couldn't resist... It was a little larger than the space available, so I had to cut/adjust it. And it's not as delicate as the chipboard gate that came with the kit, but I think it fits nicely... :)

Com a grade instalada, não dava para deixar os outros vasos grandes, não ia dar 'passagem' para os 'habitantes' em miniatura, rsrs... Então troquei os vasos de lavanda por uns menores, e clareei mais a folhagem para ficar mais realista...
With the new railing, the larger lavender pots wouldn't fit well, they would take up space and block the 'way' for the miniature 'inhabitants', :) So I downsized the pots and painted the leaves a lighter shade, to make them more similar to real ones...

Finalmente, as luzes! O kit original veio só com o LED para colocar no poste de luz externo. Eu queria um na porta também. Usei o LED original, em um tom mais quente, do lado da porta. E usei um dessas luzes de natal que não funcionava mais, e que tem um tom mais azulado, no poste do passeio. Deu muito trabalho! Queria ligar os dois no mesmo conjunto de bateria. Testava antes de soldar e funcionava bem, quando soldava, só o da porta acendia. Achei que o do poste tinha queimado... Desmontei tudo, troquei, soldei de novo e... mesma coisa! Aí, finalmente desconfiei: as pilhas só conseguiam fornecer energia para um led por vez, e o da porta levava vantagem por algum motivo... 
And finally, the lights! The original kit came with only one LED/batteries/switch kit to be used for the street lamp post. I wanted the light next to the door to work too. So I used the original LED, which had a warmer color, next to the door. And then I used a LED from a Christmas kit that was defective for the lamp post. This one has a 'cold' (bluish) shade. It was  actually a big puzzle (for me) to make them work! I wanted to connect both LEDs simultaneously, but after everything was soldered together, the 'street' led refused to work! I thought it died on me, so I disassembled everything, changed the LED, tested, re-tested, soldered again and...  same problem! Then it dawned on me: the batteries 'pack' (three small coin batteries) was enough to power only one of them, not both! 

Então desmontei uma lanterninha xing-ling, que eu já tinha, para usar o conjunto de bateria deles (+ suporte), soldei cada led em um conjunto de bateria independente, mas os dois no mesmo micro interruptor. Milagrosamente, coube tudo na base do poste (nem me pergunte como!!!)
So I used another 'battery pack' from a cheap 'made in China' finger light I had, connected each LED to its own 'battery pack', but both were connected to the same switch and, miraculously all that fit inside the 'street lamp post' base (don't ask me how...) 


Nas fotos não dá para ver bem, as luzes são mesmo fraquinhas, mas até que ficou legal, não? :)
The lights are not too strong, so you can't see them too well in the pictures, but they turned out ok, don't you think? :)

Obrigada! Thank you!
.

segunda-feira, 12 de novembro de 2012

Casa Toscana - Tuscany House

Há poucos grupos de miniatura no Brasil. Tenho a sorte de pertencer aos dois mais ativos.... :) Um deles, o MiniClube, se reúne uma vez por ano em São Paulo, para um fim-de-semana de aulas e montam um cenário. Não pude ir este ano (19 e 20 de outubro), mas comprei o kit, que vem com as instruções. Recebi o kit em 30/10. O pessoal que foi ao encontro teve só um fim-de semana para montar, e completar depois. Eu tive o benefício de ter todo o tempo do mundo e me inspirar pelos cenários já prontos, rsrs... Você verá no final da postagem o protótipo, criado por Regina Passy e com colaboração de Rose Favero, Lelis Filho e Célia Nepomuceno
There are very few miniature groups in Brazil. I'm lucky to be in two of the most active ones... :) One of them, MiniClube, gathers once a year in Sao Paulo for a weekend full of classes where they usually make a mini setting. I couldn't join them this year (Oct 19th & 20th), but I surely bought the kit, which also comes with instructions. It's not the same as being there, but I feel I participated somehow... Besides, the participants are supposed to finish the setting during the weekend or shortly afterwords. I received my kit on Oct/30th and I had the benefit of taking my time and getting inspired by the finished ones... :) In the end you'll see pictures of the prototype, designed by Regina Passy with colaboration of Rose Favero, Lelis Filho and Célia Nepomuceno.

Deixei a loja um pouco de lado para montar o kit. Já tinha feito uma extensa pesquisa de imagens da Toscana na internet e sabia bem como queria fazer alguns detalhes. Bem, foi assim que ficou:
I stopped working on my store for a while to give myself fully to the kit. I had previously made a throughout Tuscany images research on the internet and had a very clear idea on how I wanted it to look like. Well, this is what it turned out: 


Fiz também um pequeno vídeo caseiro do cenário. Desculpe o fundo feio, mas era o único lugar no quintal com boa iluminação hoje...
I also made a short homemade video of the setting. I apologize for the ugly background, but it was the only spot in the backyard today with good light...


Não posso mostrar como foi que fiz, porque a maioria das técnicas que usei fazem parte do kit/aulas, e não são de minha autoria.  Mas fique à vontade para perguntar. Se não for algo que veio com o projeto, ficarei feliz em explicar como fiz.
I'm not at liberty to show you guys how I made things, as most of the techniques I used are part of the kit/classes and I don't want to infringe copyright, I'm sure you'll understand. If you got curious, just ask me. If it was not something I learned from the group, I'll be glad to share.

O que NÃO fui eu quem fez nem estava incluido no kit está listado aqui:
regador com margaridas - Minifiore
regador e panelas de cobre - Darlene
pratos na parede - MiniMarcia
alho e tábua de queijos - Ivani Grande
garrafa de vinho e pode de azeitonas (mudei os rótulos) - Florbrás
torneiras e fechadura da porta - Cia das Artes
What I DIDN'T make myself neither was included in the kit is listed here:
water can with daisies - Minifiore
cupper water can and pans - Darlene
dishes on the wall - MiniMarcia
garlic and cheese plate - Ivani Grande
'glass' wine bottle & olives jar (I changed the labels) - Florbrás
tap/faucets on sink; door knob - Cia das Artes


Aqui seguem fotos do protótipo e links para blogs de quem já terminou seu cenário e postou na rede. (Se você fez um cenário e quer que eu inclua seu blog - será um prazer! :) - por favor, forneça o link nos comentários).
And now you can see pictures of the prototype and links to the blogs of those who have also made this kit and have published the pictures:


Links para outros kits completados:
Links to other finished kits:


Link para o blog do grupo, com fotos do encontro e dos cenários (mesmo de quem não tem blog):
Link to the online miniature group official blog, with pictures of the event and several finished settings from other members (even those who don't have a blog):


Obrigada! Thank you!
.

Related

Related Posts Plugin Blogger...