terça-feira, 27 de julho de 2010

Projeto Palhinha V - Caning Project V

A inspiração...
The inspiration...

A Cadeira

Eu escolhi fazer uma cadeira moderna. Como essa de armação de metal tubular aí em cima. Para variar, afinal, quase todo mundo faz algo de madeira ou antigo... Quis fazer algo diferente! :) 
Além disso, era uma boa oportunidade para usar algumas ferramentas que comprei em Chicago:
* um alicate que dobra arames 
* um cortador de tubos


The Chair

I chose to make a modern chair. Like this one in the picture at the beginning of this post. Just for a change, as most people usually choose to make something on wood or ancient... I wanted to make something different!  :) 
Besides, it would be a good opportunity to use a couple of tools I had bought when in Chicago::
* a plier that bends wires and tubes
* a tool that cuts tubes perfectly

As ferramentas e a estrutura da cadeira...
The tools used and the structure of the chair...

Projeto Palhinha IV - Caning Project IV

Tramando... :)
IMPORTANTE: Use agulha 26 de bordar. Ela tem uma ponta redonda que não fura o dedo!
A trama toda é feita em 4 'passagens': 
1) horizontal
2) vertical
3) diagonal 45 graus => \
4) diagonal 135 graus => /
Eu inverti as duas primeiras passagens (primeiro vertical, depois horizontal), mas isso não afeta em nada.

Weaving... :)
IMPORTANT: Use a blunt embroidry needle, so as NOT to hurt yourself! I used #26.
The caning is formed by four threadings: 
1) horizontal
2) vertical
3) diagonal 45 degrees => \
4) diagonal 135 degrees=> /
I inverted the first two. Started by vertical and then by horizontal. No problem there.

Primeira passagem.
First threading.
Primeira passagem
Saindo do segundo furo da fileira, vá até o mesmo furo do outro lado e retorne pelo mesmo furo que começou.


First threading
Tie the thread at the second lower hole of the left side and go to the right adjacent hole, then back to the same hole on the left.


Segunda passagem.
Second threading.
Segunda passagem
Parece muito com alinhavar um tecido. Desta vez, o importante é passar por cima de um fio, por baixo do próximo e assim sucessivamente. Seu mantra nessa fase é simples: "Por cima, por baixo". "Mantras" são repetições que ajudam a não perder o 'fio da meada'... :) Na volta, faça o contrário: "por baixo, por cima..." É nesta fase que user uma madeira mais fina na parte de cima da moldura ajuda muito!
No final, parece uma gaze de algodão, dessas de hospital. Não tem problema, mas se isso incomodar, pode usar um pente fino, para manter os fios no lugar certo. Eu não fiz isso desta vez!


Second threading
Feels a lot like basting when sewing. What is important here is to go OVER one thread and UNDER the next. Your 'mantra' here is "over, under..". 'Mantras' are simple sentences that if repeat while weaving, they'll help you not get lost. When you come back, do the opposite: "under, over..." In this step you'll see how important it is to have used a thinner strip on the top part of the frame
In the end, it'll look a lot like cotton gauze, the hospital kind. Not to worry. If it bothers you, you can use a broken comb to keep threads in place while weaving. I didn't do it this time... 

Terceira passagem - início.
Third threading - beginning.

Terceira passagem - diagonal \
De agora em diante, parece como bordar. Só que é até mais fácil, pois o 'ponto' vai sempre numa só direção e não tem que se preocupar com o avesso, nem com pontos solitários! :) Passe por cima dos pontos horizontais e por baixo dos verticais. Mantra: "por cima em pé, por baixo deitado" E nada de pensar bobagens, viu? :) 
Pode ver que a trama final começa a aparecer e os fios se encaixam no lugar +/- certo. Lembre de dar uma puxadinha leve do fio (cuidado para não arrebentar!) para ajudar a ajustar no lugar.


Terceira passagem finalizada.
Third threading finished.
3rd threading - diagonal \
From now on, it'll feel a lot like embroidering. But better, as you'll only work in one direction, no need to worry about the wrong side or with 'orphan' stiches! :) Go under the two companion horizontals and over the two companion vertical canes. Mantra: "over vertical, under horizontal" And no mental jokes! :)
Now you can see the caning beginning to take form and that the threads start to fall more or less in the right place. Remember to (very!) gently pull the thread (be careful not to tear it!) to help this adjustment.

Quarta passagem - início.
Fourth threading - beginning.
Quarta passagem - diagonal /
Finalmente, a última passagem! É igual à terceira, só que o mantra é ao contrário: "por baixo em pé, por cima deitado". Dar uma puxadinha de leve a cada 2 cm é fundamental para a trama ficar correta! 
A palhinha está feita!


Quarta passagem finalizada.
Fourth threading finished.
Fourth threading - diagonal /
Finally, the last threading! It's just like the third one, but the 'mantra' here is the opposite: "UNDER vertical, OVER horizontal". A gentle pull on the thread every inch woked is fundamental to help adjusting in place. 
The actual caning is now complete!


Acabamento
Se você usou uma linha na cor da palha, é só misturar água com cola branca (meio a meio) e espalhar bem. Dê umas batidinhas com o pincel seco depois para retirar todo o excesso. Repita + 1 vez. Se usou linha clara ou branca, pode pintar com uma tinta acrílica BEM diluída. É preferível pintar mais vezes até achar o tom do que usar uma tinta grossa e ficar feio!
Deixe para envernizar na peça, quando for envernizar a peça toda.
Use uma tesoura bem afiada para cuidadosamente cortar a palhinha da moldura. Deixe sempre na posição horzontal e em superfície plana.


Finishing
If you used a colored thread, all you have to do now is to use a 1:1 mixture of white glue and water and spread over it with a brush. Make sure it doesn't have any lumps, use a dry brush for that. Led dry flat. If you used white thread, use a wash of color of your preference. I used ocre tones. Apply as many layers as you need until you get the right shade.
Leave any varnishing to be done when you have the finished piece of furniture, so you can do it all at once.
Use sharp scissors to carefully cut the swatch from the frame. Let lay flat.


Finalizada, colada e tingida!
Finished, 'glued' and dyed!


segunda-feira, 26 de julho de 2010

Projeto Palhinha III - Caning Project III

A linha comum de algodão.
The common cotton sewing thread.
 O Fio
O tutorial do Ferd Sobol recomenda usar uma linha para crochê espessura 100. No Brasil não tem, só até 80. A linha de crochê tem a vantagem de ser mais resistente (você vai ter que dar uns 'puxões' leves para deixar o fio reto) e menos 'peludo'. Eu comprei desta tal linha quando fui aos EUA, mas preferi tentar com linha de costura comum para ver se era viável. E É!!! :)
Para tornar o fio mais resistente, menos 'felpudo' e evitar que fique 'desenrolando' e fique cada vez mais grosso, passe o fio - NUNCA trabalhe com mais de 1 metro de fio por vez, dá muito nó! - umas 3 vezes em cera de abelha.


The Thread
Passando cera no fio.
Waxing the thread.
Ferd Sobol's tutorial recommends using DMC Cordonnet #100. It's not avaliable in Brazil, we only have up to #80, by Anchor. I did have some that I bought while in the US, but I wanted to try using common cotton sewing thread to see if it would work too. It DOES! :)
The thread he recommended has many advantages, though. It's stronger (you'll have to gently pull it sometimes to straighten the weav), it's also less 'frizzy' and won't unwind itself as much while you're working. NEVER work with pieces longer than 3 ft, it gets tangled!. But for the sewing thread to work, you must pull it through a small lump of beeswax a few times (3 to 4). 


Projeto Palhinha II - Caning Project II

Preparando a placa
1) Corte um retângulo interno deixando somente duas fileiras externas de furos na placa, mais uma margem de 5 a 6 mm. IMPORTANTE: corte bem na reta de furos. Se cortar entre as fileiras, não terá margem nenhuma para aumentar os furos! Lixe depois se precisar acertar e tirar pontas. Para cortar pode usar uma serra de joalheiro ou um estilete, passando várias vezes. 
2) Alargue cada furo mais perto do vão central usando uma broca fina de 1,2. Compra-se em fornituras, lojas que vendem ferramentas para relojoeiros e joalheiros. Compre também o suporte para usar a broca.


Preparing the perfboard
1) Cut out a rectangle from the inner part of the board, leaving 2 rows of perforations and about 3/16" external margin for glueing. IMPORTANT: cut ON the perforation line. If you try to cut between the lines, you'll have NO margin to enlarge the holes later, believe me! :) Sand the inner part to make it smooth and straigh. You can cut the board using a jeweler's saw or a craft knife (several cuts might be necessary. No need to use pressure) . Sand afterwords to make it even or eliminate 'dents'
2) Enlarge the inner row of perforations using a small drill and 1/16" drill bit


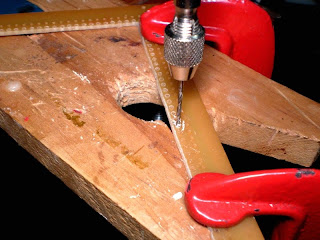
Aumentando os furos com uma broca.
Enlarging the inner perforations with a hand drill.

Montando a Moldura
O primeiro passo é montar a moldura onde será 'tecida' a palhinha. 
Material usado:
- placa de fenolite perfurada... hã???... kkkkk! é esse nome estranho mesmo! Compra-se em lojas especializadas em material de eletrônica. Não é muito caro e têm de vários tamanhos. A minha mede 10 x 15 cm.
- ripas de madeira finas, usei cedrinho. Evite a balsa porque é muito macia e não vai dar firmeza à moldura! Usei as que tinha, de 1, 2 e 3 mm de espessura. Recomendo usar só as de 1 e 3 ou 1 e 2. 
     1a)- 2 tiras de madeira: 1o,6 x 1,2 cm x 1 ou 2 mm
     2a)- 2 tiras de madeira: 10, 6 x 0,9 cm x 1 mm
     3a)- 2 tiras de madeira: 10,6, x 1,2 cm x  2 ou 3 mm
         1b)- 2 tiras de madeira: 15,5 x 1,2 x 1 ou 2 mm
         2b)- 2 tiras de madeira: 15,5 x 0,9 cm x 1 mm
         3b)- 2 tiras de madeira: 15,5 x 1,2 cm x 2 ou 3 mm
- cola branca ou de madeira

*Faça uma moldura retangular primeiro com as tiras mais grossas (3 a e b). 
*Depois faça com as tiras mais finas e mais estreitas (2 a e b), sendo que elas ficam alinhadas com a parte EXTERNA da moldura. 
*Cole agora a placa de fenolite.
*Finalmente uma terceira moldura com as tiras de madeira restantes (1 a e b). Estas ficam por cima. Veja na foto abaixo um corte transversal do "sanduíche" de madeira. 
*Reforce com mais uma linha de cola pelo lado de dentro e de baixo, entre a placa de fenolite e a moldura de madeira para garantir a firmeza. Segure com prendedores de roupa e deixe secar bem.
*Lixe bem para deixar lisa e evitar lascas prendendo o fio. Passe termolina leitosa para selar e lixe novamente. Eu faria os cantos arredondados agora. Ouça este conselho!... :)

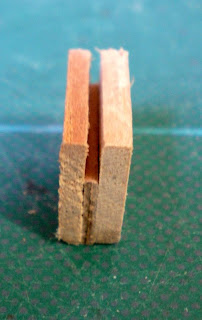
Corte transversal do 'sanduíche' da moldura. Use uma madeira mais fina que eu usei para o lado 'esquerdo'=topo.
Cross cut of the frame 'sandwich'. Use a strip of wood thinner than I did for the 'left'=top side.


Making the Frame!
The first step is to make the frame where you'll 'weave' the caning. 
Materials used:
- pre-punched IC spacing perfboard 4 x 6 avaliable at Radio Shack (so I've heard...) .
- strips of wood to make the frame. The frame is needed to prevend the perfboard to warp as you weave the caning. I used cedar wood, because that's what I had. You can use any wood you have except balsawood that is too soft and won't make a firm frame!
     (1a)- 2 strips of wood: 4 3/16" x 1/2"  x 1/32" or 1/16" thick
     (2a)- 2 strips of wood: 4 3/16" x 3/8"  x 1/32" thick
     (3a)- 2 strips of wood: 4 3/16" x 1/2"  x  1/16" or 1/8" thick
         (1b)- 2 strips of wood: 6 3/32"  x 1/2"  x 1/32" or 1/16" thick
         (2b)- 2 strips of wood: 6 3/32"  x 3/8"  x 1/32" thick
         (3b)- 2 strips of wood: 6 3/32"  x 1/2"  x  1/16" or 1/8" thick 
- white or tacky glue

*Build a rectangular frame using the thicker strips (3 a and b). 
*On top of that frame, glue another frame with the thinnest strips (2 a and b), flush with the OUTER side of the first frame.
*Place the perfboard in the center of the frame, same level as the thinnest frame.
*Finally, make and glue the top frame using the remaining strips (1 a and b). Look the picture above for the cross section of the strip 'sandwich'.
*Reinforce the frame with an extra line of glue on the bottom side of the perfboard next to the frame, to strengten the whole jig of framing. Use clamps to keep it all firmly together and let dry. 
*Sand well and aplly some sealant to prevent thread from being caught. 
*I would make the corners round now...(don't leave them square as I did!)  just saying!... :)

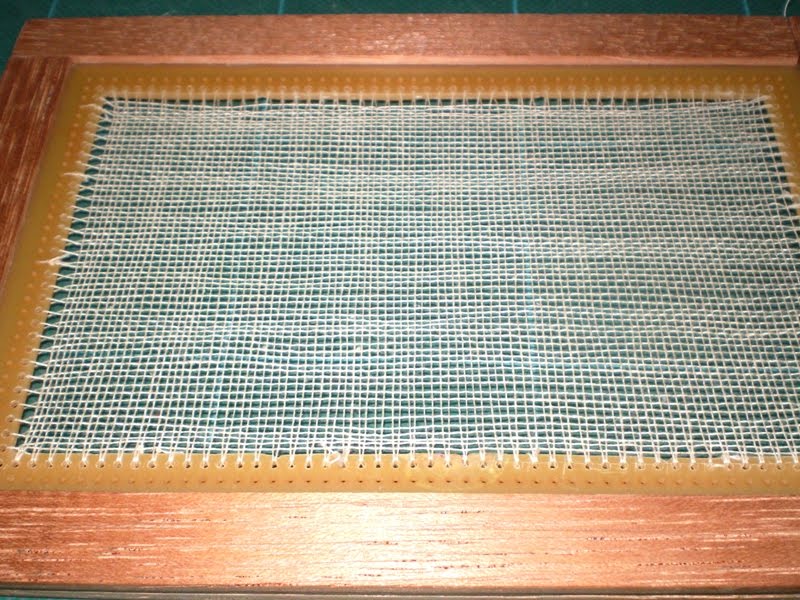
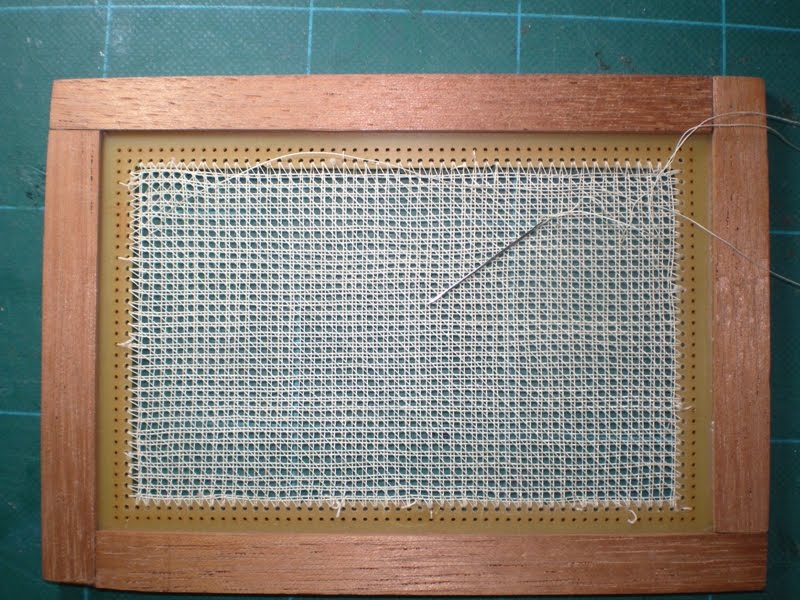
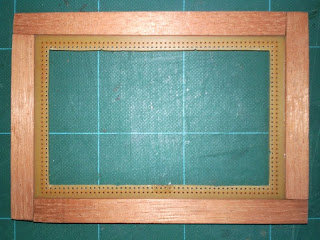
A moldura pronta! The frame is finally finished!

Projeto Palhinha - Caning Project

Palhinha modelo real - RL caning

O Projeto Palhinha é um desafio nacional lançado no grupo MegaMini. Os participantes tiveram um ano para criar um móvel ou objeto usando uma palhinha tradicional, em miniatura, preferencialmente seguindo o tutorial de Ferd Sobol, que saiu em uma revista de miniaturas americana. Ainda não vou mostrar meu móvel, porque vamos mostrar todos juntos, mas vou mostar as etapas de criação da palhinha.

The Caning Project was a nationwide project started at Yahoo Group MegaMini. The participants had a whole year to make a piece of furniture or any other object using traditional caning, inspired by Ferd Sobol's tutorial published on American Miniaturist, from September to November 2007, editions 53 to 55. I still can't show my finished chair, as we'll all 'reveal' them together. But I'll show here each step of the process.

segunda-feira, 19 de julho de 2010

Auxiliares - Helpers

Um espaço organizado é fundamental para criar com tranquilidade... Nada mais desesperador do que passar 15 minutos procurando aquela ferramenta que estava o tempo todo bem debaixo do nariz, misturada numa confusão criativa!!!

Bem, para facilitar minha vida nessas horas, eu montei esse porta-treco usando rolos de papel-toalha e papel-higiênico, forrados com tecido. E a base foi feita com papel-cartão, também forrada com tecido. O conjunto gira graças a um rolamento.Muito prático!!!


An organized workplace is fundamental to enable tranquility while creating... Nothing more exasperating than waist 15 minutes looking desperately for that tool that was right under your nose all the time, but mixed with a myriade of other stuff!!!

In order to help me on that area, I made myself a rotating tool organizer out of the central tubes from paper towel and toilet rolls, covered with fabric. Also covered with fabric is the base, cut out from cardboard. The mechanism that allows the whole thing to turn is a simple ball bearing. Very practical!!!

quinta-feira, 15 de julho de 2010

Finalmente!!!! Finally!!! MINIS...

Nem era por falta de fazer minis que eu não postava o que estava trabalhando, mas é porque eram todas ligadas a desafios e projetos comuns que não posso mostrar antes deles terminarem!...
It wasn't for lack of miniature working that I didn't post what I was working on, but because they are all (so far) linked to group challenges or projects. And I am not supposed to show them before they are over!...


Mas finalmente... Um deles terminou! O Desafio da Tia Betinha!!!
But finally... One of them is over! "Aunt Betina* Challenge"!!!

Eu não ganhei, claro!... :) Mas foi bom e instrutivo participar, gostei! Aqui vai a foto da minha obra e embaixo a criação original da Betinha Murta, que a gente deveria tentar fazer igual.
I didn't win, obviously!... :) But it was fun and I learned a lot by taking part of it, I really liked it! Here is a picture of my work followed by Betinha (* or Betina, as she's known in some intl groups) Murta's original creation, which we were to try and make a similar one.

Minha obra, com a minha versão da MoonFlower de Dana Burton, que quer muito um pedaço do bolo! :)
My version for the challenge, with my version of Dana Burton's MoonFlower ready do have a piece of cake! :)
(PS: Tropical weather is really NOT good for hair, even doll's viscose hair....)

Criação de Betinha Murta - o alvo do desafio (biscuit)
Betinha Murta's creation - the challenge aim (cold porcelain)

segunda-feira, 12 de julho de 2010

Livros com miniaturas / Books with miniatures in the story

Às vezes, ao invés de FAZER miniaturas, me divirto LENDO sobre elas, em livros e revistas especializadas, ou na internet. Recentemente descobri um novo prazer: ler livros de estórias com o 'universo' das miniaturas como cenário ou até papel principal. Bão dimais!!! (como se diz em Minas...) Só um detalhe, são todos em inglês, sem tradução no mercado nacional à vista... :(

Sometimes, instead of enjoying my time MAKING miniatures, I have a great time READING about them, in specialized books, magazines, or on the internet. Recently I have found a new source of pleasure: novel boods where miniatures play a very important role. Awesome!!!! Too bad for most Brazilians that they aren't avaliable in Portuguese, only in English - and fluency in the language is required...

Anyway, here they are:


O primeiro que eu descobri foi no Art Institute de Chicago, onde ficam as Thorne Rooms. É uma aventura com dois amigos, uma menina e um garoto, de uns 12 anos, que descobrem uma chave mágica que os faz encolher até ficarem na escala 1:12. Eles dão um jeito de visitarem os famosos ambientes em miniatura por dentro e vivem eletrizantes aventuras. Muito bom!
Além disso, dá para sentir que se está dentro de cada ambiente mencionado, tão detalhada é a descrição.

The first 'story' book where miniatures play a main role was by chance while I visited Chicago Art Institute, where the Thorne Rooms are hosted. 
The book is about a couple of 12-year-old kids who find a magical key that can shrink them to 1:12 scale. In small size, they visit several of the Thorne Rooms after hours. There they live some very interesting adventures, being able to "be" in the era that the room represents. Very entertaining!
Also, you can 'revisit' in your mind all the rooms as if from inside. The descriptions are very clear.


Depois, enquanto pesquisava outros livros sobre miniatura na internet, descobri um livro de mistério e assassinato com as miniaturas como fundo de pano importante. A autora, cujo pseudônimo é Margaret Grace, já escreveu outros livros na mesma série, com os mesmos personagens principais, que pretendo ler assim que conseguir comprar! A estória é muito bem escrita, fica difícil largar o livro. E além disso, como miniaturista na vida real, ela dá várias dicas de como fazer miniaturas de itens comuns, tanto no meio da estória quanto uma lista generosa de outras dicas no final.

Some time later, while searching on the internet for books on miniature on the internet, I came across a mistery novel where minatures and a small miniature show play an important row. The author, who writes under the name of Margaret Grace, has so far written about 5 books in the series, always with the same main characters. I really want to read them all, as soon as I can manage to get them! The story is very well developed, a page-turner. Besides, there are plenty of trash-to-treasure tips all over the story and also a generous list of other tips at the end of the book. Thumbs up!!!

Related

Related Posts Plugin Blogger...